Friday, February 24, 2012

Nail Art Tutorial – How To Make ‘French Butterfly-2’ Nail Design, One Stroke


Hi everyone!

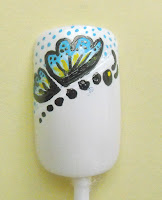
Today’s design includes work with acrylic paints and one stroke technique again and it is a very interesting way to create unusual French manicure. The sideswipe over the tips of your nails is actually a butterfly :)

French Butterfly-2

Advice: This design is very beautiful, unusual and delicate. The time you need to make it depends on whether you’ll use it on each nail, or on some nails. The acrylic paints we’re going to use dry very fast and make your work easier. If your mess up your drawing, just up clean with a wet ear stick and repeat the steps. Have fun!

Step by Step Tutorial

Products:

- Nail Polish for the background: white
- Acrylic Paints for the decoration: black, white, yellow, light blue
- To seal the design: Top Coat
- Additional tools: flat brush (size 4), thin nail art brush (9mm), palette (I’m using a fake CD instead), glass of water, napkin

Products

Design:

1. Polish all nails with white (or another light color) and let them dry.


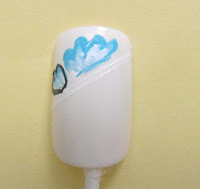
2. Using the white acrylic paint and a thin nail art brush, make one diagonal sideline to from the smile line of your French tip. This line will act as a guide to know where to draw your butterfly. Again – it’s always better to first draw your motive on a piece of paper to have a better view of your design.


3. Dip one side of your flat brush in white and the other one in blue acrylic paint. Of course, you can combine other colors of your choice. Always dry your brush in a napkin in order not to make the paints too wet. Paint two small butterfly wings – the first one you’ll make with 3 and the second one with 4 strokes.


4. Outline the wings with black paint using the thin nail art brush.


5. Make thin black lines in the bottom part of the wings and small dots in the upper ones.


6. Draw the body of the butterfly starting with a big dot for the head, continuing to make smaller dots to build the body and finishing with two small antennas.


7. For an accent, make thin lines between the black lines in the wings. Make a tiny dot as an eye.


8. Make small dots on the white tip areas of your nails using the same color you used for the upper part of the wings (in my case it’s a light blue paint). If you want to you can add additional motives in the left white areas. Don’t forget to experiment freely, as the acrylic paints are easy washable with clear water.


9. Apply a top coat! This is very important, because the acrylic paints are water dissolvable. When you’re finished don’t forget to wash the remaining paints with water off of your palette.

DONE!

Wish you luck and great artistic mood :)

Greetings!

P.S. Inspired by love4nails

Nail Art Tutorial – How To Make ‘Butterfly-1’ Nail Design, One Stroke


Hi guys!

I want to share with you one great design, hoping you will enjoy working on and staring at it. It is the first one from my Butterfly-Series and includes the use of one stroke technique. Have fun :)

Butterfly-1

Advice: This design is very beautiful and delicate. The time you need to make it depends on whether you’ll use it on each nail, or just e.g. at your ring nails. The acrylic paints we’re going to use dry very fast and make your work easier. If your mess up your drawing, just clean up with a wet ear stick and repeat the steps. Have fun!

Step by Step Tutorial

Products:

- Nail Polish for the background: cyclamen
- Acrylic Paints for the decoration: black, white, yellow, light blue
- To seal the design: Top Coat
- Additional tools: flat brush (size 4), thin nail art brush (9mm), palette (I’m using a fake CD instead), glass of water, napkin

Products

Design:

1. Polish all nails with a nice color of your choice and let dry.


2. Paint the butterfly we’re going to create first on a normal white sheet. Don’t make it perfect! This step only helps to have an accurate idea of what motive exactly you want to create in advance.


3. Dip one side of your flat brush in white and the other one in yellow acrylic paint. Of course, you can combine other colors of your choice. Always dry your brush in a napkin in order not to make the paints too wet. Paint two small butterfly wings – make the upper one bigger.


4. Outline the wings with black paint using the thin nail art brush. Make pointed edges.


5. Paint the body of our butterfly starting with a big dot for the head and two small antennas.


6. Make tiny white dots at the pointed edges, the body and the antennas. Make one dot as an eye.


7. Make some details on the wings with the black paint. Between them make some thin blue lines as an accent.


8. Apply a top coat! This is very important, because the acrylic paints are water dissolvable. When you’re finished don’t forget to wash the remaining paints with water off of your palette.

DONE!


Wish you a very pleasant time while painting your butterfly :)

Take care!

Nail Art Tutorial – How To Make ‘Purple Circles’ Nail Design For Clear Tips / Gel Nails


Hi there!

The design I’m going to show you is very simple and is perfect for gel nails with clear tips.

Purple Circles

Advice: This design is very fast and easy to make. You can also use it over natural nails, but the transparent effect of the circles will not be so distinct. Have fun :)

Step by Step Tutorial

Products:

- Nail Polish for the background: purple
- Nail Polish for decoration: decoration blue glitter
- To seal the design: Top Coat
- Additional tools: blue glitter powder, needle, brush, cotton pad

Products

Design:

1. Polish your nails with a color of your choice and let it settle just a little bit, without letting it dry.


2. Using the sharp edge of a big needle make some circles on the tips of your nails (you can either remove all the nail polish, or let a small dot in the center of the circles). You’ll see how all the applied nail polish over these areas will be removed and so the circles will become transparent.


3. Make small dots with a decoration glitter polish in the center of each circle. Let the dots dry and apply small amount of clear polish over the areas with the circles. Use any brush and sprinkle some glitter powder on it.


4. Apply a top coat.

DONE!


Try out the design over clear-tipped nails for best results :)

All the best!

Nail Art Tutorial – How To Make ‘Sexy’ Nail Design


Hi everybody!

This nail art design is very attractive and sexy :)

Sexy

Advice: This design is very fast and easy and the final result attracts many eyes because of the selection of sexy colors, which play very nice together. When making the design, leave your nails unpolished / polished just with clear polish and work only on your tips. In my example I’m using an artificial nail, so I can’t achieve a natural look. That’s why I applied first a very light orange polish. Have fun :)

Step by Step Tutorial

Products:

- For the background: no polish / clear polish (for the bottom part of your nails), white and black (for the tips)
- Nail Polishes for decoration: silver and decoration black
- To seal the design: Top Coat
- Additional tools: thin brush from a decoration nail polish, cotton pad, piece of paper

Products

Design:

1. Make one silver line starting from one side of your nail, curving it upwards and finishing almost in the middle of your tips.


2. Polish your nail tips with red polish and apply it only at the outer side of the silver line.


3. Fill in the inner area formed by the silver line with white polish. Let your nails dry.


4. Over the white area make some uneven black stripes – just like tiger prints. Wait for the design to dry.  


5. Cover your nails with top coat.

DONE!


Elaborate this design using exactly these colors. It looks great over gel nails :)

Greetz!

P.S. Inspired by love4nails

Nail Art Tutorial – How To Make ‘Dark French’ Nail Design


Hi everyone!

The design I’m going to show you is of a standart French manicure, created with dark colors and some dots to make it nicer. It’s perfect for the late going-out :)

Dark French

Advice: This design is super fast and simple and in the same tine very attractive. Have fun :)

Step by Step Tutorial

Products:

- Nail Polishes for the background and the decoration: silver with glitters, black
- To seal the design: Top Coat
- Additional tools: dotting tool, cotton pad, peace of paper

Materials

Design:

1. Polish all nails with silver polish with glitters. Let them dry.


2. Use a black nail polish over your tips. You can decide what kind of smile line to make – rounded, edged or sidewiped.


3. Using a dotting tool make small black dots under your smile line – over the silver polish. Now the black polish should be already dry, so you can make small silver dots over it and just above the smile line. Wait for the design to dry.


4. Seal everything with top coat.

DONE!


Have fun while showing your nice nails around :)

Be safe and til next time!